Hello World (No Programming)
Android Development
Hey fellas its been a while from the last post. Some you might though I have stopped writing android blog, what a relief !!!!
In last two blogs we have seen some theoretical concepts regarding Android Development. In this blog we'll directly jump into some sort of easy programming and how to create an Android Project or Android Application.
So today we'll see how the basic HELLO WORLD application is created.....
Lets get Started...
Just go through the steps mentioned in my blog simultaneously if possible.
Step 1: Hit the android studio and get started.
when you start Android Studio you will get a popup asking you whether you want to start a new project or open existing project or import existing project.
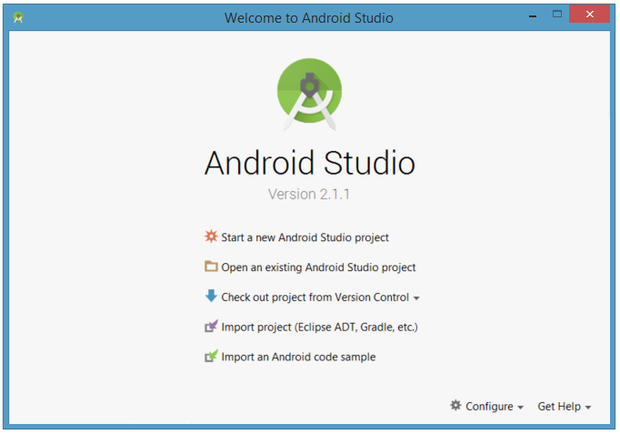

Click New Project.
After you clicked on the New Project, you will see the pop-up window as below

In the above window you'll be asked the following contents
I) Application Name:
Give Any Application Name you wish to.Here I have HelloWorld as my Application name.
Note: Always start your Application Name with a Capital Letter ( Java Rules for defining a Class)
As here i have two words Hello and World, have a close look on the application name i have a Capital letter at the start of every word without any space
II) Company Domain:
As far as this application is considered we don't have to pay attention to this field as we are not going to deploy it. But when it come to future project you will have to change the project.
In your screens you'll have "com.example" as your default company name. It doesn't have any problem with this company name while programming, but it'll cause a major problem while deployment of the application on Play Store or any of app stores. Because there are alot of newbies using com.example as their company name and the access will given to the first developer who have register to play store or any app store.
So make sure you change the Company name for the future projects, In my project i have company name as "juvil.androidblog.com" you can have your own company name.
III) Package Name:
You do not have to change this as it'll automatically be set in accordance with your Application name and Company name.
IV) Project Location:
Project location is the work-space you need to have it on your drive. Its up to the developer where he/she wants to store the project/Application.
Once you complete this information go to to next.
Step 2: Target your Device of Interest
After the basic information you fill the next you have to select the device for which you are building this application.

As shown above you will have different android devices for which you can create application form android studio.
We will select "Phone and Tablet" as we will deploy it on.
Minimum SDK is the minimum version of android. if you want to learn more about android version Click Here!
Step 3: Adding Activity

While selecting the activity we'll have a variety of activities. For the beginners LIKE ME we'll choose either empty activity or blank activity depending on the version of android studio you are using. If you are using the latest version go for Empty Activity.
Step 4: Customizing Activity

In this step we'll customize the activity.
Here we have
I) Activity Name
By default we will have MainActivity as the activity name. For the smaller projects usually we don't change the name and it remains as MainActivity, but for the larger project we may or may not change the name as MainActivity is the easiest way to find which will be the first activity that will be launched
Note: While defining a Activity follow the Java Standards as explained previously in this blog while defining you application name.
II) Layout Name:
Now layout will define your Graphical User Interface with the naive user.
Note: Layout name should not contain any capital letter or space.
When you finish this hit Finish.
When you Finish the setup of application. It will start building Gradle.
What is Gradle?
Gradle is a project automation tool that builds upon the concepts of Apache Ant and Apache Maven and introduces a Groovy-based domain-specific language (DSL) instead of the more traditional XML form of declaring the project configuration.
Whether Building gradle is important?
Yes,Gradle is a custom build tool used to build android packages (apk files) by managing dependencies and providing custom build logic. An apk file gets signed and pushed to the device using ADB(Android Debug Bridge) where it gets executed. Gradle is a build system.
Step 5: Run the App
Note: While the gradle is building do not touch it or it will affect your R file.
what is R file will have a closer look on it next blog and how important it is.
Once the gradle is build you'll have see the workspace of android studio.

This is how Android Studio workspace looks like.
Connect your device, make sure you have necessary device driver of your device or just start ADB manager. and Run the app as pointed in the snapshot.
After building gradle and installing the application in your phone you will see the output as shown below.

So today we have gone through basic HelloWorld Application. In the next block we will go through the WorkSpace in Android and What is R file and how important it is.Until then if you like the blog do subscribe and if you have any doubt comment in the box below. Stay tuned for the next blog.


Comments
Post a Comment